Hızlı ve kolay bir şekilde sende web site sahibi olmak istiyorsan tek yapman gereken sitenin aşağısında bulunan iletişim formu üzerinden gerekli bilgileri girmen. Hepsi bu kadar.
Web Siteye Reklam Ver
Sende web sitemize reklam vermek veya ilan vermek istiyorsan. Tek yapman gereken sitenin en altında bulunan yere iletişim bilgilerini girmen yeterli olacaktır. Ekip arkadaşlarımız siziznle iletişime gececektir.
Web Sitemizin Yazarı Editörü OL
Sende kalemine güveniyorsan web sitemizde bir şeyler paylaşmak yazmak istiyorsan siteinin en aşağısında bulunan iletişim formunu kullanarak bizimle iletişime gecebilirisni
In a previous article, I noted how the range of motion of crunches is not conducive to building a strong core. Crunches will only effectively engage the rectus abdominal muscles, while some of the surrounding important core musculature is not addressed. Ultimately, it is a basic exercises that serves little purpose for individuals with more than a few of strength training experiences.
The biggest problem in many "ab" routines that I see people do is that there's no progressive overload. People will do the same handful of exercises for the same number of sets and repetitions every session, week after week. Now, imagine you did that with a back squat, or with any other movement: what if you just squatted 135 pounds for 5 sets of 5 repetitions on every leg day? You might make a little bit of progress for a week or two, but eventually you're not going to continue to make gains. Your legs won't get any bigger or stronger. The same is true for the abdominal muscles. If you're just doing 3 sets of 15 crunches, 3 sets of 20 Russian twists, etc., then guess what? Your core isn't going to get any stronger either. I watch many people do the same core exercises day in and day out, and they aren't continuing to adapt.
There are four ways to create progressive overload for strength training:
Increase the number of repetitions. If you've been sticking with 3x10 leg lifts, for example, try to do 3x15 next week. This is one way to add volume.
Increase the number of sets. Additionally, you can add in more sets to increase total training volume.
Increase the amount of time. This is specific to isometric movements like the plank, hollow hold, side plank, etc. Try to increase the length of the hold by 10-15 seconds per week.
Add load. I like to add weighted ab exercises into my programs, once the client has demonstrated competency in the non-weighted variation. Examples of exercises include weighted hanging knee raises, weighted planks, weighted sit-ups, cable chops, and weighted leg lifts.
Change the exercises. Get creative. There are so many exercises out there that allow you to continue to progress. Constantly challenge yourself. I constantly post new exercise ideas on my Instagram page, such as those in the above links, so always be on the lookout for new ideas. Just when you think you have abs of steel, you find a new exercise variation to humble yourself once again.
If you're going through the same routine multiple times per week, you may still "feel a burn," but you're not necessarily going to achieve the desired result of a rock solid core. Instead, here are my suggestions for improving your core training. Core training has to be progressed in the same way that you would continue to periodize the big strength movements. Think outside of the box and don't get complacent with your ab routine!
If I had to pinpoint one "tight area" about which many people complain most, it's the hamstrings. I'll often find gym-goers using multiple methods to stretch those stubborn muscles: asking a partner to push them deeper into a stretch, or yanking on their legs with bands. Yet, somehow, despite their forceful, repeated efforts, the hamstrings seldom seem to sustain lasting changes in flexibility or range of motion.
Stop and think before you yank your hamstrings into oblivion.
The hamstrings are a very important muscle group for athletic performance. They are two joint muscles, meaning they both flex the knees and extend the hips. While strong, these muscles have a tendency towards facilitation (overworking). When a muscle gets tight, that typically means it's working hard for another muscle that's inhibited, or not firing properly. In the case of the hamstrings, we're usually looking at gluteus maximus/medius dysfunction and/or core dysfunction. In short, if your hamstrings are chronically tight, you have to check the muscles upstream in the kinetic chain and see how they're firing (or not).
In this video, Dr. Kathy Dooley demonstrates how one can alleviate tension in the hamstrings just by getting the core to fire properly. This is one such exercise that you can utilize before a heavy squat or deadlift session just to encourage proper core activation. You'll notice that doing this exercise regularly will have a dramatic impact on your hamstring flexibility. It has been more immediately effective with my clients than the traditional stretching methods, as this exercise attacks the source of instability and weakness, rather than trying to treat the symptoms.
This Bushman puts Kim Kardashian to shame.
The "core," or, in this particular case, the rectus abdominis, is an antagonist of the hamstrings. What this means is that as the hamstrings lengthen/relax, the rectus abdominis flexes the lumbar (lower back). For example, in a forward bend, in which we are standing and reaching over to touch the ground, our knees are extended, lengthening the hamstrings. The trunk is in flexion, assisting the hands in reaching towards the floor. If we do not have adequate strength in the rectus abdominis, the hamstrings won't be able to relax enough to let you get lower. In short, strengthening a muscle's antagonist can work wonders in releasing it from tension.
Similarly, weakness in the gluteus medius/gluteus maximus can result in tight hamstrings. Both the glutes and the hamstrings work synergistically as hip extensors. You've probably heard of the term "glute amnesia" before, which connotes butt muscles that don't activate properly. The cause of this is too much time spent in hip flexion (read: sitting), and not enough time running, jumping, and lifting! Now, if your glutes don't show up to the (hip extension) party, then someone has to take over their job. You've guessed it: the hamstrings are now responsible for the majority of your hip extension! No wonder they're in a perpetual state of tension–they're holding onto your hips for dear life.
What are the best ways to tackle these movement dysfunctions? Here are some of my favorite exercises:
So while stretching the hamstrings may give you some immediate relief, you have to analyze why they're getting tight. If you continue to repeat the same process and it just isn't working, it's time to find a new plan of attack. Work those glutes and strengthen that core, and you may just free yourself of your constant need to stretch your hammies.
Works Cited:
Dionne, Cassie. "Stretching Your Hamstrings Isn't Always Best." Breaking Muscle. N.p., n.d. Web. 20 July 2016.
Dooley, Kathy. "Dooley Noted: Core Instability Hiding as Tight Hamstrings." YouTube. YouTube, 04 May 2013. Web. 19 July 2016.
Nickelston, Perry. "Top 10 Muscle Imbalances and What To Do About Them #1." Stop Chasing Pain. N.p., 2 May 2016. Web. 11 July 2016.
Yessis, Michael. "Stretching The Hamstrings." YouTube. YouTube, 25 July 2011. Web. 12 July 2016.
My friend Michael was nice enough to write a guest post for me this week! Michael is a competitive weightlifter who has been performing the olympic lifts for a little over 2.5 years. He recently obtained his Honors Bachelors of Science in Kinesiology and plans to go on to complete a degree in Physiotherapy. He has gathered a lot of hands on experience working in a physiotherapy clinic for the last five years and is passionate about human strength and performance. In his spare time, he enjoys long walks on the beach and romantic comedies.
I only train my core isometrically. Without movement. No sit-ups, no side bends, no toes-to-bars, no Russian twists, none of that. I do this for two reasons: safety and functionality.
Safety
Firstly let’s look at the spine. It is made up of a series of bony vertebrae with vertebral disks in between them. Vertebral disks are made of two parts, the outer, solid layer called the Annulus Fibrosis, and the inner, viscous layer called the Nucleus pulposus. A herniation occurs when the inner layer pushes its way out through the outer layer, often (very painfully) impinging a nerve coming off the spinal cord. I don’t need to tell you that as an athlete, you don’t want this. No one does. If you do herniate a disk and it hits a nerve root, you’re looking at a lot of pain, rehab, and potentially months off of your sport.
Core exercises that involve movement of the spine increase your chances of suffering a disk herniation. Research shows that repeated spinal flexion (bending forward) is needed to cause disk herniations [1][2]. If a researcher wants to herniate a spine specimen, they will put it through thousands of cycles of flexion and extension with moderate compression. That is exactly what you are putting your spine through every time you do a sit-up or a poorly executed back extension on a GHD (compression in this case is caused by your own core muscles, think of each vertebrae as a book stacked on top of another, your muscles squeeze down on the stack of books to keep them from falling over). Why would you put your spine through that? There are several safer, more effective alternatives to train these muscles. Research also shows that repeated twisting also makes you more vulnerable to a herniation by slowly wearing away at layers of the annulus fibrosis, making it easier for the nucleus pulposus to herniate [3]. Sure, Russian twists are working your obliques, but at what cost?
The human spine is very good at absorbing compressive forces, the vertebrae--disks and vertebral curves all allow for this. The spine is not, however, nearly as good at handling forces like shear. For example NIOSH, a health and safety board recommends a spinal compression force of no higher than 3400N during work tasks, while the limit for shear forces is only 1000N [4]. The exact numbers are not important, but safety experts agree that our spines are about 3.5 times better at handling compression than they are shear. Excessive shear becomes a problem when the spine is fully flexed forward[5] (think sit-ups, toes-to-bars, etc). These exercises definitely do a good job of working your rectus abdominus, but not without introducing potentially dangerous and unnecessary shear forces on your lumbar spine. Exercises that keep the spine in neutral or near neutral are safer because they put the spine in a position to handle forces compressively instead of introducing shear forces.
At this point is when someone would usually say something along the lines of “Well I do exercises X and my back is fine! This can’t be true.” Your back may be fine if you’re doing these exercises now, but it may not be in the future. You may be fine in the future too even if you continue to do these exercises, but you are definitely increasing your risk by continuing to do so. To succeed in any sport, you need to stay healthy. There is no reason to put your spine through potentially dangerous exercises when safer alternatives exist (more on these alternatives later). Also, you should keep in mind that the absence of pain does not mean the absence of injury. Only the outer layers of the annulus fibrosis contain sensory nerve fibers [6], so during the early stages of a herniation, pain would not be an issue.
Functionality
Almost every sport I can think of requires a core that is neutral or near neutral (don’t think of neutral as a perfect position, think of it as a certain small range of motion around that position), and a core that is braced isometrically. The only example I can think of where this isn’t true is gymnastics (but gymnasts are freaks of nature, so let’s ignore them) and maybe swimming or rowing. I’m sure there are more, but that doesn’t really matter. Most sports require a neutral, isometrically braced spine.
This is especially true of strength sports. The squat, Snatch, and Clean & Jerk all require a neutral spine that is braced isometrically. Those who bench with an arch won’t have a neutral spine and some deadilfters prefer pulling with their spine in a little bit of flexion, but both of these exercises definitely require the spine to be braced isometrically. If strength athletes always need isometric core strength, the majority of their core training should be isometric as well. Since the spine is capable of moving in three different planes, the core should be trained isometrically resisting motion in all three of these planes. You should select exercises that resist flexion and extension (bending forward and backwards), lateral flexion (bending to either side) and rotation (twisting). Below is a list of exercises that I have had good success with implementing in my training, that challenge the core in all three planes of motion. Assuming you have the basic stability needed to do them, these exercises are a solid foundation.
This list if by no means exhaustive. Get creative and find what works for you.
At the end of the day, you can train your core muscles in whatever way you want to train them. Just be aware of the risks and rewards that come with your choice of exercises and take this information into consideration before your next core workout; it’s probably not worth it. Stay safe!
Works Cited:
ADAMS, M A, and W C HUTTON. 'Prolapsed Interverfebral Disc'. Spine 7.3 (1982): 184-191. Web.
Arjmand, Navid et al. 'Revised NIOSH Lifting Equation May Generate Spine Loads Exceeding Recommended Limits'. International Journal of Industrial Ergonomics 47 (2015): 1-8. Web.
Callaghan, Jack P, and Stuart M McGill. 'Intervertebral Disc Herniation: Studies On A Porcine Model Exposed To Highly Repetitive Flexion/Extension Motion With Compressive Force'. Clinical Biomechanics 16.1 (2001): 28-37. Web.
Drake, Janessa D.M. et al. 'The Influence Of Static Axial Torque In Combined Loading On Intervertebral Joint Failure Mechanics Using A Porcine Model'. Clinical Biomechanics 20.10 (2005): 1038-1045. Web.
McGill, Stuart et al. 'Shear Happens! Suggested Guidelines For Ergonomists To Reduce The Risk Of Low Back Injury From Shear Loading'. 1998. Presentation.
Yes, this model has an incredibly impressive physique, but I'm referring specifically to her posture. Her ribs, in particular, are the first thing I notice.
Rib flaring is an extremely common postural fault. I mainly see this in women, but there are many men who are guilty of flaring ribs as well.
You might be thinking, "you can only see her ribs because she's so lean!" or " maybe that's just the way her ribs are!" No. Her ribcage sits that way because of core instability and a lack of thoracic awareness.
A forward ribcage usually goes hand in hand with other postural issues like lordosis and scapular winging. An unstable core results in dysfunction all up and down the kinetic chain. Ideally, we want to maintain our center of mass over our...well, center. There should be a straight line leading from the ear lobes all the way down to the ankles (lateral malleoli). Note the drawing on the right. This photo details the optimal posture: his weight is centered on his whole foot, his ribs sit directly over his pelvis, and his head does not jut forward like many sedentary, laptop-absorbed folks we see today.
If the ribcage protrudes in front of the hips, we cannot properly engage the rectus abdominis, and, thus, the function of the muscles around shoulders, hips, knees, and ankles will be compromised.
Additionally, the ribs will pull forward your center of gravity and affect your balance, along with your gait. Any movement will be altered, because your ribs are, quite literally, several steps ahead of you.
At the other end of the spectrum, take a look at Georges St. Pierre, a professional MMA fighter. You will notice that his core is rock solid and stable, unlike the bikini model in the above picture. Maybe that's why he's one of the most successful (and highest paid) fighters! Which of these individuals do you think has a stronger abdomen?
Someone's standing posture will tell you a lot about how their bodies will move during weighted exercises. Just imagine how both of these individuals will look once they press barbells overhead. The lifter with a flared ribcage will almost, 100% certainly, be hyperextended, while an individual with proper abdominal bracing can maintain a secure position.
Sometimes, a prominent ribcage will not be immediately visible while standing. In this case, I employ the wall slide test. If a client cannot bring their forearms to the wall without reaching their ribs forward, they fail the test. I now know that they have limitations in the shoulder, and I work from there.
This model does NOT pass the test...
9 times out of 10, telling someone to bring the "ribs down" is not enough to help them understand. I've realized that these people usually lack the kinesthetic awareness to do that--they don't know how to properly engage the musculature around the ribs.
When I see someone with ribs like the woman in the first photo, I immediately check their breathing. I am never surprised to see that these people abuse the muscles in their necks and chests to breathe rather than taking advantage of their diaphragms. Often, breathing alone will make a huge impact in the position of the ribs. Aside from doing breathing drills, I like to use the following exercises to teach my clients how to activate the muscles that retract the ribs:
Teaching proper joint alignment will allow for optimal posture and mechanics in all activities. Strive to employ better movement patterns. Don't lift weights you can't move without perfect technique. You may limit your risk of injury, and you will be much stronger in the long run. Keep your ribs down, and learn to utilize the core properly!
A few weeks ago, I wrote a post on breathing properly for your lifts. This week, my friend Nate Henry, a competitive powerlifter, wrote a wonderful follow-up article. His strongest lifts include a 523.5 pound squat in competition, and a 535 pound squat in the gym, weighing 206 pounds. His best meet total is 1,372 pounds! He is also currently pursuing a bachelors degree in Kinesiology and an NSCA CPT. If you want to move big weights like this guy, follow his advice.
I mean...look at this guy.
Brief Squat Overview (Kinesiology)
Before I get into anything, let's review all of the primary muscles that are used within the squat because a lot of people overlook them.
When you’re lifting or doing anything and figuring out what muscles are being utilized, you have to analyze the dynamic (moving) joint to be able to identify the muscles worked. The muscles being worked are the ones that are fighting against the load.
As you squat there is movement in these joints:
Hip (femoral acetabular joint, femur connects in the acetabulum in the coxal bone)
Knee (tibio-femoral joint, where the femur connects to the tibia)
Ankle (taleo-tibula joint, where the tibia meets the talus)
Spinal column (vertebral column)
Sacroilliac (SI, or lumbo-sacral) joint which is where the column connects to the illiac.
Analyzing the movement against resistance, standing up when you squat, we can identify the action of the muscle taken. In this case:
Hip extension
Knee extension
Plantar flexion (ankle)
Spinal extension (and depending on the lifter, there can be a posterior or anterior pelvic tilt in the SI.)
Rather than listing out all of the muscles involved, here are some nifty graphs I made to show what muscles are responsible for what movement:
Keep in mind these are only the primary muscles and these do not include the statically loaded muscles or the secondary muscles involved in the movements.
Now what?
Now that we’ve identified all the muscles we can get into this cueing business, the muscles will come into play a little later. Outside of reminding everyone reading this that their set up is the most important part of the squat (don't rush it, set up every set the same, etc.). I’m going to assume you’ve squatted before in your life, and I'll get right to it.
One of the biggest things that helped me advance my own squat was learning to properly brace and learning to “breathe into my lower back.”
A lot of lifters rant about “getting tight” and “getting your breath,” but what the heck does that even mean? It’s one of those things that if you know it, you get it. If you don’t, it’s hard to explain fully.
The whole point of getting “tight” or bracing is to prepare your body to handle load. Usually in the form of the Valsava Maneuver (holding your breath). However, a lot of people can’t even breathe correctly without load, so getting your breath and bracing properly is hard to do if you’re just starting out.
That breath and bracing is the most important and overlooked aspect of the squat next to having a proper unrack/walkout.
The reason this is so important is because if you’re not bracing completely you’ll put a lot of pressure on different muscles. We talked about spinal extension as one of the movements in a squat right? Well, when you’re just bracing the frontal core (the rectus abdominis plays a huge role in stabilizing the muscles responsible for spinal extension), you’re leaving your back completely unprotected, even with a belt! When you’ve got something heavy on you, that weight will zero right in on your weakest part of the back and that’s how back injuries happen and why.
This cue is especially important for low bar squatters who tend to use more extension in the back to leverage heavier weight on the way up.
To add to that, a lot of lifters might get the back tight (flexing it rather than creating the tension through the diaphragmatic breathing) and then tip forward because there is no brace on the front. This can also create some havoc within the muscles being worked. The quads may try to take proportionally more load than needed and the hip extensors try to pick up the slack. Things can get weird.
The point is, you need to brace and create that pressure. This is how I learned to do that.
Why breathe into my lower back?
Your core musculature wraps all the way around. A lot of lifters just breathe into their stomachs, creating little pressure, and not getting 360 degrees of tightness throughout all the musculature, extrinsically, nor intrinsically. They lack the understanding of what full abdominal expansion feels like; that’s where this cue comes in handy.
Put your hand on your lower back. Breathe into your stomach with a proper breath (fill it like a balloon). Not much going on in the lower back right? Or the sides, really, correct?
Now, do the same thing but try to breathe into the back while still trying to fill in the balloon (if that’s not helping, try to breathe into the lower back lying on your back and try to focus on pushing against the ground). If you’re doing this correctly, you should feel your back, stomach, and sides fill with air. Put your hands on your sides as well, you’ll feel it.
This is what I mean by breathing into your lower back. Proper inhalation helps your muscles in the core/lower back get tight/brace. Think of your core musculature as your body's own belt.
Using this, let's go over a quick squat without getting too much into the whole process:
Approach the bar, get your hand placement.
Without rushing, get under the bar and get your placement down (high/low/hybrid). Dig into the bar, get the hands set, get everything nice and stable.
Get your hips under you (both feet, not split stance this will prevent injuries in the back as well)
Breathing into your lower back, and getting the full breath first, unrack the bar.
Take your first step back, settle.
Bring your other leg back, settle. Adjust this foot if need.
If you’re squatting really heavy and the bar is whipping, let it settle. Good walks, make good lifts.
If you let out some air during the walk, retake the breath but make sure you create pressure during the walkout phase because even though you’re not squatting, you’re still having to move around that weight.
Squat
Stand up
Retake the breath (don't descend without completing the breath!)
Repeat
I like using Chad Wesley Smith as an example, since he’s the one who introduced me to this cue. Here he is squatting 825 for a double.
Notice the control, the time put into the set up, and how he breathes. Now, Chad is an Elite Squatter. He’s quick about it. Take your time.
The cool thing is this applies to all disciplines: CrossFit, Powerlifting, Strongman, Weightlifting, Bodybuilding.
Try these tips, and add serious weight onto your lifts.
Works Cited:
Nuckols, Greg. "Squat Mechanics – The Red Pill." Strengtheory. N.p., 23 Feb. 2015. Web. 02 June 2015.
Smith, Chad W. "10 Steps to Great Squatting Technique." JTS Strength. N.p., 20 Aug. 2014. Web. 02 June 2015.
Smith, Chad W. "Squatting Specifics - What Technique Is Best for Your Sport?" JTS Strength. N.p., 22 Aug. 2014. Web. 02 June 2015.
Part of assimilating into the "lifting culture" means geeking out over new purchases like shoes, wrist wraps, straps, and belts. It's easy to fill up your shopping cart pretty quickly on Amazon.com or other similar websites. The question is, how much of these items are necessary, and what is extraneous and perhaps counter-productive?
I've been hesitant to write this post, because I know many people hold very strong opinions on this issue. There are plenty of people at an elite level who are using lifting belts to deadlift 800+ pounds, so it's natural to want to copy what those guys are doing and hope that all of this gear will lead to similar gains for you. If only that were the case...
Personally, I am not an advocate of belts (and most other "accessories" for that matter, but I'll save that for another post) in many circumstances.
First of all, it's important to understand why you're using a belt in the first place, because I believe a lot people have a great misunderstanding of the purpose of a belt. Some people are under the illusion that the belt will magically prevent back injuries. At the moment, there isn't a lot of evidence to support that belts reduce injury rates or lower back pain in any way. According to the CDC, "although back belts are being bought and sold under the premise that they reduce the risk of back injury, there is insufficient scientific evidence that they actually deliver what is promised."
Stuart McGill also notes that "[individuals] who have never had a previous back injury appear to have no additional protective benefit from wearing a belt," and "those who are injured while wearing a belt seem to risk a more severe injury."
A belt is meant to provide additional support and stability for the muscles of the trunk. Basically, the tension of the belt increases intra-abdominal pressure, activation of the spinal erectors and rectus abdominis. All of these things are clearly important in lifting heavy weight. So why do I have such a conceptual problem with using a belt?
A lifter needs to learn to create intra-abdominal pressure sans belt. When one becomes too reliant on a belt to stabilize his core, the risk of injury without one may increase. Essentially, a belt becomes a crutch for poor bodily awareness and motor learning. If you constantly step under a loaded barbell with your belt on, it's going to be much more difficult to move without it!
A belt will create a false sense of security in a lifter, and thus potentially stunt the growth of postural muscles like the erector spinae, multifidi, external obliques and rectus abdominis, as their roles become more limited with equipment.
In my opinion, a belt is most useful upwards of about 85% of your 1 rep maximum on a squat or a deadlift. That's it. Heavy weights require a greater degree of tension in the body, and that's where the belt will come in handy. You should not be warming up with your belt, and you should not wear it all of the time. When you are working up to a heavy single, or doing a ton of high volume work at high intensity, the use of a belt may be warranted and helpful. If you are not, however, training for a sport that requires you to be stronger than your competitors (such as Strongman, CrossFit, powerlifting or weightlifting), then I don't think using a belt is necessary at all. Instead, you could stand to benefit from a ton of practice in maintaining intra-abdominal pressure without the aid of equipment. Both your intrinsic and external muscles will get stronger in the process.
Again, this is my personal philosophy. Obviously for sports like powerlifting, a belt is going to be necessary after a certain point, but make sure you're strong without it as well. I rarely use belts unless I'm approaching 100% on my lifts. I prefer to train organically, when I can. I feel more accomplished knowing I was able to move a certain amount of weight without the aid of a belt around my waist. Some people like the security of having a belt, but I think it's always better to teach your body how to create that strength on its own.
Works Cited:
McGill, S., Norman, R.W., and Sharratt, M.T. (1990) The effect of an abdominal belt on trunk muscle activity and intraabdominal pressure during squat lifts. Ergonomics, 33 (2): 147-160.
Reddell, Cheryl R., Jerome J. Congleton, R. Dale Huchingson, and John F. Montgomery. "An Evaluation of a Weightlifting Belt and Back Injury Prevention Training Class for Airline Baggage Handlers." Applied Ergonomics 23.5 (1992): 319-29. Web.
Reyna, J.R., Leggett, S.H., Kenney, K., Holmes, B., and Mooney, V. (1995) The effect of lumbar belts on isolated lumbar muscle. Spine, 20 (1): 68-73.
Several months ago, I wrote an article called "Perfecting Your Push-up," in which I gave you some insight on how to correct some common flaws in a seemingly simple (yet incredibly intricate) movement.
This post will be a sequel to that post, as a solid plank is the foundation of a push-up.
The plank is a staple exercise in many bodybuilding, strength and conditioning, and even powerlifting programs. It's an isometric movement that teaches (ideally) total body rigidity and stability. The forearm or straight-arm planks can be excellent exercises to develop the core if executed properly. Here are some cues to help you get your planks straight:
If you're doing the plank on your hands, make sure your fingers are spread so that you can "grip" the ground." If you are doing the plank on your elbows, keep the arms parallel to one another, still spreading your fingers
Stack the elbows directly underneath the shoulders in both variations
Place the feet close to one another
Squeeze your butt*
Actively pull your shoulder blades downward to engage the lats*
I put asterisks next to numbers 4 and 5, because I think they are the most common mistakes in a plank. We like to think of the plank as an "ab" exercise, but yet, we forget about the muscles that should assist the abdominals in this movement like the latissimus dorsi and the gluteus maximus. If you're not squeezing your butt, you're likely drifting into hyper extension, and if your lats aren't engaged, your shoulders are in an unstable position. All of these synergist muscles work complement each other beautifully to stabilize the core.
One other crucial mistake I have seen people make is to try to go until absolute muscular failure. They hold the plank as long as they can even if their bodies are shaking and their hips start to drop towards the floor. This completely defeats the purpose of the exercise and reinforces a bad position. As soon as you lose the integrity of the movement, stop! If you start to shake, give yourself a minute or two to recover before doing another set. Remember, more is not always better.
When the standard plank becomes too easy for you, you can try other variations: single arm planks, single leg planks, weighted planks, shoulder taps (in which you touch one shoulder and then the other shoulder without moving the hips), plank press-ups (in which you go from a forearm plank into straight arm plank, and back into a forearm plank) and so on and so forth! There are many different possibilities.
The next time you want to do planks, make sure you're doing them properly! You will get more out of the movement, and that strength will translate into other activities.
You work these muscles 23,000 times a day, on average, but chances are, you're using them incorrectly. In our sleep-deprived, high stress lifestyles, many of us are breathing incorrectly several thousand times a day, everyday over the course of our lives.
The core musculature like the rectus abdominis, diaphragm, internal and external obliques also allow for efficient breathing. If you're not breathing correctly, the sequencing and integrity of all of these muscles will be compromised. Your hours of "ab circuits" will all be for naught.
In my opinion, emphasis on proper breathing while training (or just normal daily function) is paramount. Here's why:
Prevents facilitation (overuse) of trapezius, scalenes, and sternocleidomastoid muscles
Teaches proper diaphragmatic activation
Proper core sequencing for all activities
Improves ability to return to parasympathetic nervous system (reduce stress)
Better recovery and reduced risk of injury
Intra Abdominal Pressure
In any big lift like a squat, bench, or deadlift, creating sufficient intra-abdominal pressure is mandatory for safety. To quote Dr. Yuri Verkohansky, "Without breath-holding, far greater pressure is exerted on vulnerable structures of the lumbar spine, in particular the intervertebral disks and ligaments." Basically, if you're not breathing correctly, you risk herniating a disk or placing additional shear forces on your vertabrae. I see far too many lifters getting under (or over, in a deadlift) a loaded barbell without sufficient abdominal bracing.
Shoulder Stability
If you breathe through the neck and chest, as many people I interact with do, your shoulders are going to remain in a shrugged or elevated position. This means the shoulders are unstable and you will have an increased risk for rotator cuff tears, dislocations, pectoralis major/minor tears, or labral tears. If the muscles normally used to stabilize your shoulder, like the serratus anterior, are forced to help you breathe instead of performing their primary roles, your shoulders are in danger.
Hip Stability
Similarly, the stability of the hips will also be compromised without proper breathing. Muscles like the quadratus lumborum may become overactive if the rectus abdominis or external obliques aren't firing correctly.
Conditioning
If you're training your aerobic energy system, which requires oxygen to function, and you're not getting sufficient oxygen into your lungs, guess what? You're not going to be able to run/bike/swim as hard or quickly as you would otherwise. Shallow, chest breathing is not optimal for oxygen uptake. Rather, deep breaths through the diaphragm are ideal.
Recovery
Chest and neck breathing is the result of the sympathetic,"fight or flight" nervous system taking over, while diaphragmatic breathing brings the body back to the parasympathetic "rest and recover" nervous system. Remaining in the sympathetic nervous system = increased recovery time. If you're trying to train hard and improve performance, you need adequate recovery.
Have I convinced you just how important your breath is to all facets of training and general health yet?
Now, take a moment to monitor your own breaths. Are you breathing through your mouth? Does your chest expand as you inhale? Do your traps constantly feel tight?
The ideal way to breathe is through the nose, with the tongue on the roof of the mouth (which will encourage diaphragmatic expansion) and expand the belly and the ribcage with each breath. Your ribcage should expand 360 degrees with each inhalation. We want lateral expansion of the ribs at the same time as it expands forward and backwards.
Now, I'm going to give you some tips on how to improve your breathing habits. Here are three of my favorite "core" and breathing exercises:
Crocodile Breathing
Lay down on your belly with your hands crossed in front of your head
Take a big breath in through the nose with the tongue on the roof of the mouth
Focus on expanding the stomach and the lower back as you inhale
Exhale slowly and completely through the mouth
Manual Resisted Breathing
Lay on your back and have a partner sit next to you.
The partner should place his/her hands on your stomach
As you inhale through the nose, keep the tongue on the roof of the mouth
Partner provides gentle resistance to your diaphragm during inhalation
Hold your breath for 1-2 seconds at the top
Exhale slowly and completely through the mouth
Kettlebell Breathing Drill
Place feet hips distance at a right angle against the wall
Hold a light dumbbell or kettlebell on the belly (10-15 lbs)
As you inhale, focus on pressing your stomach up against the weight and expanding the rib cage
Count to ten as you inhale, pause at the top, and count to ten as you exhale through the mouth
These are three fantastic exercises to bring your body back to the parasympathetic nervous system and find some peace from your chaotic day. If you take these simple steps to improve your breathing, I can guarantee you that the results will be profound. You will improve your mechanics, become more stable and mobile, and, most importantly, inch towards a more stress-free lifestyle.
Just breathe!
Works Cited:
Anderson, Tim, and Geoff Neupert. Original Strength: Regaining the Body You Were Meant to Have. N.p.: n.p., n.d. Print
Dooley, Kathy. "The Professional Website for Dr. Kathy Dooley" | Dr. Dooley Noted." The Professional Website for Dr. Kathy Dooley" | Dr. Dooley Noted. N.p., n.d. Web. 10 Apr. 2015.
Myers, Thomas W. Anatomy Trains: Myofascial Meridians for Manual and Movement Therapists. Edinburgh: Churchill Livingstone, 2001. Print.
Check yourself: as you read this, are you taking deep, full breaths, or is your breath shallow and inconsistent?
I've found that my clients have the tendency to forget to breathe as the they lift. They're getting ready for a max back squat and they step under the bar with a completely unstable abdomen.
You take, on average, over 20,000 breaths per day, yet somehow, in today's stressful society, breathing is not always automatic. When people are anxious or preoccupied, they may forget to breathe, or their breathing may not be of adequate depth.
The respiratory system, courtesy of www.philschatz.com.
Now, above I've placed a photo of the respiratory system. As you can see, there is a lot going on there. Many people who are stressed or are in the sympathetic nervous system response (fight or flight), will breather primarily through the neck and chest--this is usually easily visible. Someone who is calm and in the parasympathetic nervous system should breathe through the diaphragm, and you will note that their bellies and lower ribcages will expand as they inhale.
The respiratory system obviously provides our brains with oxygen, but it also helps to stabilize our abdomens. When we inhale, the diaphragm contracts and presses up against the lungs, and as we exhale, the diaphragm relaxes.
A proper diaphragmatic breath helps us create intra-abdominal pressure. On a compound movement like a squat, deadlift or bench press, maintaining that intra-abdominal pressure is imperative for safety of the spine and maximal power output.
He may be cute, but we certainly don't want to emulate his physique!
My friend Wileen, a Licensed Massage Therapist and practitioner of NeuroKinetic therapy, gave me this wonderful example--she said that without sufficient intra-abdominal pressure, the body is much like the Slinky Dog in "Toy Story." Essentially, the abdomen will be soft and unprepared to handle a sufficient load.
Would you rather lift with a body like that of Slinky Dog or that of Buzz Lightyear? I have my money on Buzz Lightyear any day of the week.
A heavy lift requires a substantial amount of tension in the body, from the feet, all of the way up to the torso. Without that necessary rigidity, the risk of injury is exponentially higher, and the amount of energy we are wasting comes in droves.
A strong core creates bigger lifts. We can't optimize the strength of the thorax without proper spinal bracing via the breath, so therefore, a stronger breath means more weight on the bar! You follow me?
Now, down to the nitty gritty. You may be wondering how you should breathe on these big lifts. There is a technique that many lifters employ called the Valsalva maneuver. This is just one way to breathe to take advantage of the intra-abdominal pressure. I will warn, though, that anyone who has a history of high blood pressure should not breathe this way, as it does raise the blood pressure even more. Ideally, we want to inhale through the nose, which facilitates a full contraction of the diaphragm. Then, we should engage the abdominals. I tell my clients to imagine like I'm going to punch them in their stomachs. Once they have that down, they may begin the movement. During the hardest part of the movement, or the end of the concentric phase (think of standing up on a deadlift or squat or locking out an overhead press), they should forcefully exhale through the mouth. If they are doing a set with multiple reps, they should repeat this before each repetition.
This photo of the Valsalva maneuver in action demonstrates an iron clad core. As you can see, the airway is cut off and the diaphragm is contracted abdominal cavity expands. This individual is ready to move big weight.
Many people use lifting belts to enhance this effect. The belt acts as somewhat of a tactile cue to improve that core stabilization. I won't get into that too much today, though, as that is enough material for an entirely new post.
As you can see, the way you breathe has a profound impact on your performance, both in and out of the gym. It's is extremely important to learn how to maintain intra-abdominal pressure throughout a heavy lift for both efficacy and safety.
The squat, lunge, bench press and overhead press are all great exercises--they are compound movements that will help improve strength, power, and stability. Unfortunately, I see many people performing this movement on a machine that limits the benefits of these movements: the Smith machine.
Don't try this at home...or anywhere else, for that matter.
You've probably seen this machine at your gym before. The Smith machine is where great exercises go to die.
The reason why I am so adamantly against the usage of the Smith machine is simple: the machine creates stability for you by forcing you to move through a fixed range of motion. Part of the glory of a squat or bench press is that our bodies must find stability on their own. When you take a barbell out of the rack, you may feel a little bit shaky at first. Your shoulder stabilizers are working hard to prevent the barbell from yanking your arms behind you during the bench press. The same phenomenon occurs on the squat. If you can't properly stabilize your hips, you will either fall backwards or forwards, or your knees will cave inwards as you stand.
Squatting on the Smith machine is basically like telling your core to go take a nap while you do your set. You will notice that you will be able to squat significantly more weight on a Smith machine, because you don't need to stabilize your midline! As a result, your legs can concentrate solely on moving the load on your back. While this may sound like a positive, I can assure you it is not. If you want to improve your body's reflexive strength and prevent unnecessary injuries like rolled ankles, then stick to free weights.
When you're walking down the street, you are not moving on a fixed plane. Your hip adductors work to prevent excessive hip abduction, and vice versa. Your torso must rotate slightly to navigate your center of mass. These actions are innate and help create efficient movement. Similar reactions happen in the squat: your abductors prevent the ugly valgus knee position, your erector spinae instinctively push against the barbell to prevent your torso upright, and your glutes are suppose to help you extend the hips as you stand. Many of these muscles will go to sleep when you squat on the Smith machine, because they aren't necessary.
Don't cheat yourself. Wake up your stabilizer muscles and train with purpose.
Here's a quick little test you can do on your couch to test your squat. Focus on maintaining an upright torso when you stand up from a seated position or when you squat. It's important to reinforce good movement patterns at home so that you can move well in the gym. Pay attention to the way you move and you will be surprised of what you find.
“Trust that the body is a self righting organism. Our job is to guide the process.”
On paper, the push-up seems like a very simple exercise. Surely we've perfected it after all of those years of high school gym class, right? Truth be told, I see a lot of people who execute this exercise incorrectly and inefficiently.
While it may seem self-explanatory, there are actually a lot of little nuances to executing a correct push- up that many people do not realize. This movement is truly underrated, in that it requires a lot more shoulder strength and core stability than we may think at first glance. While watching someone perform a push-up, I can pinpoint just where their weaknesses are. If someone has a limited range of motion, unstable or weak shoulders, or poor core control, it will be apparent after just a few repetitions.
What does the perfect push-up look like? Here are a few cues:
Start with your palms a little wider than shoulder width and fingers spread
Rotate your elbows so that your biceps are facing forward
Squeeze your butt and tighten your core
Lower your body until your chest touches the ground
Keep your elbows at a 45 degree angle (do not let your elbows cave inward)
Make sure your shoulders do not collapse
Fully extend your elbows at the top
As always, we want a full range of motion. If you do not have the strength to do a push-up, use your knees. It is better to use a full range of motion on your knees than try to attempt a partial range of motion without them. There is no need to move quickly here--in fact, push-ups are harder if you do them at a slow and controlled pace.
Once you have mastered the standard push-up, you can move on to more advanced variations: pike push-ups (in which your legs are elevated), handstand push-ups (against a wall or freestanding if you feel so daring), one-handed push-ups, clapping push-ups, one-legged push-ups, diamond push-ups, etc. I could go on and on. There are a seemingly infinite number of push-up progressions, so you will never get bored with them!
The push-up is truly unparralled in developing strong shoulders and solid core control. This fundamental gymnastics movement is a great exercise and provides no equipment but yields superior results. Personally, I like to do 20 push-ups every morning when I wake up, and maybe another 20 before I go to bed! Give that a try. You may choose to start with fewer or more repetitions depending on your level of strength. Enjoy!
The most aggravating fallacy I hear is "squats are bad for your knees." No, you know what's bad for your knees? Squatting improperly. Sitting is also really bad for your knees, but that's another discussion entirely.
CrossFitter Miranda Oldroyd doing a heavy back squat.
Squats just might be the number one best exercise for you. Why? Well, there are many reasons, but the number one reason being that it is extremely applicable to daily life. Every time we sit down in a chair, go to the bathroom, or pick something up off of the floor, we are doing a variation of a squat. To quote the CrossFit journal:
"Squatting is just one example of a movement that is universally valuable and essential yet rarely taught to any but the most advanced of athletes. This is a tragedy."
Aside from its universal application, a properly executed squat will work every muscle from your abdominals and the erectors in your spine all of the way down to the muscles in your feet. Squats are great for increasing total body strength.
So if you want to get better at any given sport, improve your overall strength, and get legs of steel, squats are the way to go! Here are some other amazing benefits of squats, if you aren't sold already:
Squats help improve hip, glute and hamstring flexibility.
They increase your overall power output (think about how much power is necessary to get out of the bottom of a heavy squat).
A recent study showed that squats improved the sprint performance of rugby players
Another study suggests that squats increase the height of your vertical jump
They improve core strength
Without squatting, we would not be able to perform simple everyday tasks life requires. It is impossible to sit in our desk chairs without squatting first. We can't avoid doing them, so we might as well embrace them!
Sources:
Comfort, P., Haigh, A., et al. Are Changes in Maximal squat Strength During Preseason Training Reflected in Changes in Sprint Performance in Rugby League Players? Journal of Strength and Conditioning Research. 2012. Published Ahead of Print.
Matuschek, C., Schmidtbleicher, D. Influence of Squatting Depth on Jumping Performance. Journal of Strength and Conditioning Research. 2012. Published Ahead of Print.
Okada, T., Huxel. K., Nesser, T. Relationship Between Core Stability, Functional Movement, and Performance. Journal of Strength and Conditioning Research. January 2011. 25(1), 252-261.
Our posture is the foundation of every movement we make. Whether we're sitting, going for a jog, or doing a deadlift, proper spinal positioning is crucial to both preventing injury and the efficiency of your movement. The fact of the matter is that the movements you're resorting to at your computer desk are going to translate to your movements in the gym.
So what is considered "good posture?" Dr. Kelly Starrett, author of Becoming a Supple Leopard: The Ultimate Guide to Resolving Pain, Preventing Injury, and Optimizing Athletic Performance breaks it down into three easy steps:
Squeeze your butt
Align your ribcage with your pelvis
Tighten your core (about 20% tension for low-impact activities like sitting, 100% for a max deadlift)
Neutralize your head position and roll your shoulders back into a good position
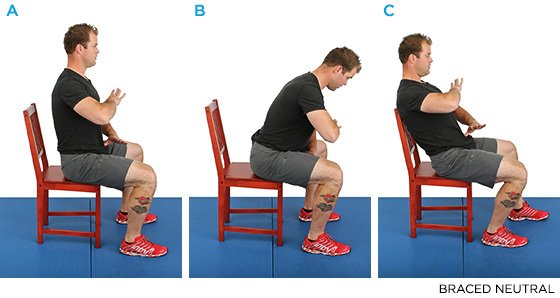
Ideally, these 4 cues will lead you to a safe position regardless of the task. As I mentioned a few weeks ago in my post about core strength, a nice, strong core is essential to proper posture. Our core prevents our lower backs from arching and stabilizes our hips and shoulders. In these images, Dr. Starrett illustrates these concepts. As a point of reference, he places one hand under his breastbone (sternum) and another hand on his pubic bone. If your posture is aligned properly, your hands will be parallel to one another.
Image A illustrates a properly braced spine. In Image B, Starrett rounds his shoulders, and in Image C, his lower back is excessively arched.
Here, Kelly demonstrates all of the positions you can sit in comfortably with a braced spine.
So next time you're sitting at your desk at work, take a moment to focus on your posture. Are your shoulders rounding forward? Are you arching your lower back too much? If you are, simply stand up, follow the bracing sequence, and sit back down.
Sources:
Starrett, Kelly, and Glen Cordoza. Becoming a Supple Leopard: The Ultimate Guide to Resolving Pain, Preventing Injury, and Optimizing Athletic Performance. Las Vegas: Victory Belt Pub., 2013. Print.
We've all been guilty of it at one point or another: pounding away hundreds of crunches in hopes of getting a "six pack." The fact of the matter is that many people care about "getting abs" for their aesthetic value rather than focusing on training them for developing stability and core strength. It is called your "core" because that is where every movement initiates. Whether you're squatting, deadlifting or doing an overhead press, it all starts with a tight, strong core. The core muscles allow you to stabilize your hips and shoulders: that is their primary function. Treat these muscles as the gateway to total body strength. You want to see real "core strength?" Look at a gymnast or a pole dancer--they have complete and total control over their centers of gravity. Essentially, developing a strong core means manipulating your center of gravity efficiently and effectively.
Russian Olympic gymnast Alexei Nemov
So why are crunches a waste of time? There are many reasons, but the main reason being that crunches are only really engaging the rectus abdominis muscles (the superficial muscles that can make up a "six pack"). This means that your intrinsic core muscles (like the transverse abdominis), your obliques, and your hip flexors are all left unactivated. To be more efficient and really develop core strength, you must utilize all of the rectus abdominis and activate the hip flexors. The hip flexors will help stabilize your pevis in exercises like the squat or the deadlift. As I mentioned earlier, the CrossFit methodology notes that "[they] train [their] athletes to think of every exercise as an ab exercise." While doing designated core exercises can be beneficial, you must remember to engage your abs in every exercise that you do.
The most important thing to note, however, is that if you really want "6 pack abs," you must, and I repeat, must make sure you follow a healthy diet. Body fat percentage is what really accounts for visibility of muscles. You can't expect to counteract eating a whole pizza by doing 100 v-ups and running a mile; our bodies simply do not work that way.
Sorry! The content you were looking for does not exist or changed its url.
Please check if the url is written correctly or try using our search form.
Bigger Archive Portal
Other portals
World War I , Africa ,United States of America ,Anime and manga ,Ankara ,Anthropology ,Military • Astronomy • Asia • European Union • Azerbaijan • Azerbaijan (Iran) • BBC • Beşiktaş • Science • History of science • Biography • Byzantine Empire • Bosnia -Herzegovina • Jazz • Sexuality • Geography • China • Language • Religion • Literature • Energy • Armenia • Eurovision • Evolutionary biology • Philosophy • Feminism • Fenerbahçe • Palestine • Physics • France • Football • Galatasaray • South Korea • Georgia • Harry Potter • Aviation • Hinduism • Christianity • Iraq • England • Human rights • Internet • Iran • Islam • Istanbul • Scouting • Izmir • Japan • Kazakhstan • Cyprus • Kuwait • North Korea • North Macedonia • Culture • Lady Gaga • LGBT • Liberalism • Madonna • Mathematics • Media • Mexico • Michael Jackson • Mustafa Kemal Atatürk • Music • Middle East • Middle World • Ottoman Empire • Automobile • Free software • Pakistan • Psychology • Russia • Art • The Simpsons • Cinema • Politics • Socialism • Soviet Union • Sports • Syria • History • Technology • Television • Terrorism •Medicine • Theater • Society • Turkish Armed Forces • Turkish history • Turkey • Video games • Judaism • Stargate