Bayram Cigerli Blog

Bigger İnfo Center and Archive
  • Herşey Dahil Sadece 350 Tl'ye Web Site Sahibi Ol

    Hızlı ve kolay bir şekilde sende web site sahibi olmak istiyorsan tek yapman gereken sitenin aşağısında bulunan iletişim formu üzerinden gerekli bilgileri girmen. Hepsi bu kadar.

  • Web Siteye Reklam Ver

    Sende web sitemize reklam vermek veya ilan vermek istiyorsan. Tek yapman gereken sitenin en altında bulunan yere iletişim bilgilerini girmen yeterli olacaktır. Ekip arkadaşlarımız siziznle iletişime gececektir.

  • Web Sitemizin Yazarı Editörü OL

    Sende kalemine güveniyorsan web sitemizde bir şeyler paylaşmak yazmak istiyorsan siteinin en aşağısında bulunan iletişim formunu kullanarak bizimle iletişime gecebilirisni

Examples etiketine sahip kayıtlar gösteriliyor. Tüm kayıtları göster

Extracting Data


Most data extraction Url parameters will work for BlurbBits (to embed on your page) , the BlurbBits Mapr (to help build your BlurbBits/Maps), or the BlurbsViewr (to navigate your site). Online photo parameters can also be used.

Blogs

This is where your work pays off.. we can put your Blog entries on a map or create a Photo Blog Album. We will extract a lat/lng position from the entry text or the first BlurbBit (with an llz position) and the first photo for each Blog entry . The text option is necessary when using Blogger mobile via email, which doesn't support html without rich text emails (not available through most remote email services).

The lat/lng text format is DD MM.MM[N|S] DDD MM.MM[E|W] (with no extra characters i.e. 36 17.63 N 30 08.98 E). The separator between lat/lng can be a space, comma or /. The llz= parameter can also be added as a string (llz=[-]DD.DDD,[-]DDD.DDD,Zoom i.e. llz=36.2938,30.1497,14) where - is used for South and West and zoom is optional but should be used if changing between remote locations (middle of ocean, zoom = 8) and street/anchorage maps (zoom=15).

Note: The text MUST be on the same line with no Extra characters.


In order to extract both photos and positions from Blogger the Full Post Feed MUST be enabled. Go to Settings-Site Feed and make sure Allow Blog Feeds is set to Full (or Blog Post Feed in Advanced Mode).

Note: We will combine duplicate locations and if more than 50 unique entries are found, they will be averaged over the whole set. Text Blog entries should be updated when internet is available by adding either a BlurbBit link or an embedded version. You can define the maps zoom level and it allows other tools, utilities and your RSS feed readers to enjoy your location.

A Map of Blog Entries:
&blogger=BlogName:Number:Options or bloggerid=BlogId:Number:Options
  • BlogName is configurable portion of your Blogspot addess
    ex: use blurbbits for http://blurbbits.blogspot.com
  • BlogId is used to access the data for ftp published blogs
    Create a new Post or Edit an existing post
    you should see post-create.g?blogID=XXX or post-edit.g?blogID=xxx
    ex: use the blogID value (XXX)
  • Number is the number of entries to extract. Default is 10
    ex: svbillabong:20 would get last 20 entries and extract any positions found
  • Options (quess what? they are optional)
    Confusion again: Blogger calls a feed query for labels.. categories
    If options are used a number
    Must be specified ex: username:10:category=Pasta

    • Category: use category=lab1,lab2 to filter by labels
      ex: fromthegalley:10:category=Recipes or fromthegalley:10:Recipes,Pasta
      Note: Labels are Case Sensitive and special characters must be escaped.
    • OrderBy: use orderby=updated to get blogs organized by recent updates instead of blog entry date. Great for updating your old blogs and adding new photos and letting people know what you've been working on lately!!
    • published-min: use published-min=dateTtime to set the minimum published date and time. Only posts that are published after this date will appear in the feed (not updated) . Use the RFC 3339 timestamp, ex: 2005-08-09T10:57:00-08:00.
      YYYY-MM-DDTHH:MM:SSTZ where TZ (timezone) can also be Z
Interactive Examples:
&blogger=svbillabong
A Blogger map for svbillabong.blogspot.com
&blogger=svbillabong&mv=where&mi=in
A Blogger "Where is Billabong?" map with link to latest Blog
&bloggerid=13526182
The same map accessed via BlogId
&blogger=svbillabong:50
The same map but 50 entries
&blogger=sandpiper38:100:category=Indian%20Ocean
Search for Indian Ocean + map locations. Try Indonesia, Mediterranean

Photo Blog Album: &bp=1

No we haven't gone off the deep end. This is a great way to navigate and preview your photo blogs and show the blog location(s) at the same time. If a photo is not found, the blog will not be added to the album. If a location is not available the individual blog map will not appear. Remember we currently use the first photo so make it a good one.
  • Adding &bp=1 to &blogger creates a Photo album of the blog. Any geo-tagged blogs will appear in the summary map and for with individual Blog entry photo.
  • Click the Notes button for a preview of each blog entry.
  • Click the open link button to open the selected blog in a new window
Interactive Examples:
&blogger=fromthegalley&bp=1
A Photo Blog album of FromTheGalley (Try your blogger account)
&blogger=svbillabong&bp=1
A Photo Blog album of svbillabong (the BlurbBits photos are used)
&blogger=fromthegalley:10:category=Recipes,Freezable&bp=1
A Photo Blog Album of from the galley with Freezable & Recipes
&blogger=yachtbalvenie:10&bp=1
A Photo Blog Album of yachtbalvenie
&blogger=yachtbalvenie:10:orderby=updated&bp=1
Yachtbalvenie with recent updates first (notice the photo order)

This format is specific to BlurbBits to define a photo view vs just a simple map view. Within the BlurbsViewr all data is supported (although only those with locations are mapped). Photos will appear in the map tooltip and will be converted to map icons once the tooltip is viewed.

Blogger Photo Size:


Blogger uses the same photo sizes as Picasa for photos that were uploaded to Picasa recently . The bp=1 option can be used with other feeds however photo scaling support is limited to Blogger, Picasa and Flickr (until we add more).

Winlink Quick maps: &winlink=Callsign:number

Do you use winlink to report your yacht's position? Add a quick map, up to your last fifteen position.
  • Callsign is your winlink callsign
  • number is optional and specifies the number of entries to extract. Max is 15.
Interactive Examples:
&winlink=KC0RMX
Map of last 15 locations of callsign
&winlink=KC0RMX:1&mv=where&zooms=13,5&mi=in
Where Map (described below) includes link to winlink interactive map for this callsign

Google spreadsheets: &gss=SpreadsheetId:Number

If you haven't used Google Docs yet, you have to check them out. We use Google Spreadsheets to gain web access to Mapr Scratchpad data.
  • SpreadsheetKey: The Key for your Published spreadsheet.
    When you are editing a document you should see the following path http://spreadsheets.google.com/pub?key=pB293mcNyGGy8SmJCPOwDfQ
    ex: use pB293mcNyGGy8SmJCPOwDfQ
  • number (optional) Specifies the number of entries to extract. The default is all rows.
Interactive Examples:
&gss=pB293mcNyGGyXtOwzu-R5Jg&mark=midredx&smark=smallred&mtitle=Our%20Latest%20Wanderings
Our Latest Wanderings (look familiar)
&mtitle=Uhuru%20Positions&gss=pB293mcNyGGy8SmJCPOwDfQ&mark=midredx&smark=smallred
A friends circumnavigation

GeoRSS Feeds: &gfeed=Path:Number
  • Path: The Url location of an rss feed.
    Note: make sure all Path parameters are escaped (? = %3F and & = %26) or they will be processed incorrectly as BlurbBit/Utility parameters instead of feed parameters.
  • Number: Maximum number of entries (default is based on feed)
  • A fallback for general use
    Feeds vary greatly in their content, format and details so it is almost impossible to design a general feed reader that will handle/format the data in which is optimal for a specific purpose. All of the feeds above started out from a basic GeoRSS feeds and where highly customized based on the desired result and available content.

    We will attempt to extract positions and plot them. However this is an unsupported base format, ie. If it works great.. if it doesn't we're sorry.
  • We will be working hard to add more formats into BlurbBits. If there is something you would like to see please Contact us. We are also available for consulting or custom development.
Interactive Examples:
&gfeed=http://earthquake.usgs.gov/eqcenter/recenteqsww/catalogs/eqs7day-M2.5.xml:50
Last 50 Earthquakes
&gfeed=http://maps.google.com/maps/ms%3Fhl=en%26ie=UTF8%26t=h%26source=embed%26msa=0%26output=georss%26msid=100073405698197242227.00046087dc764f3de70c9
A Google Map RSS feed (escaped). Try your MSID parameter. Use the pp=blog option to re-order the feed if needed.
&gfeed=http://mapnut.com%2Fcalstatepark.xml:50
The first 50 State Parks
&gfeed=http://picasaweb.google.com/data/feed/api/user/SailBillabong%3Fkind=album%26alt=rss
Our Raw Picasa Album Feed

Extracted Map Views: &mv=where
  • where: Map only the last location (i.e. Where are they?)
  • Used with extracted maps
    Creates two zoom levels
    If a link is specified it will appear in the bottom left of the map
  • We will be working on extracting other map views
Interactive Examples:
&blogger=svbillabong&mv=where&mi=in
A Blogger Where map with link to latest Blog
&gfeed=http://earthquake.usgs.gov/eqcenter/recenteqsww/catalogs/eqs7day-M2.5.xml:50&mv=where&mi=in
The Last reported earthquake with link to the detailed page
&gss=pB293mcNyGGyXtOwzu-R5Jg:10&mv=where&zooms=14,8&mi=in&mark=midredx&smark=smallred&mtitle=Our%20Latest%20Wanderings
Where view from Latest wanderings
&mtitle=Uhuru%20Home&gss=pB293mcNyGGy8SmJCPOwDfQ&mark=midredx&smark=smallred
A circumnavigations end point (their start/finish point)

In the BlurbsViewr this will cause the map to zoom to the last entry location (if it has a position).

Using extracted data with BlurbBits Mapr

The extraction methods above (and the photos) also work as parameters to the BlurbBit Mapr. If a location is found it will be placed on the map, otherwise it will appear in the Mapr sidebar list as location unknown (a world with a ?). Clicking on a unplaced entry will add the marker to the map drag cursor which can be dragged into position and placed with a click. You can also find the location first using the Find a Location dialog box, click Go and adjust the maps zoom level to the desired level. Then drag the unplaced entry to the LLZ finder and click to assign its location.

NOTE: This does not and will not modify the source data. You will still need to add the BlurbBit into the original data source (Blog Post), or modify the source directly (photos) .. sorry but we can't do everything. For Picasa album option, the BlurbBit for each album is automatically extracted by default.

This method is also good for testing existing BlurbBits data. If the position doesn't show up in the Mapr when extracted, it wouldn't show up in the extracted BlurbBits.

In this mode the geoRSS feed can be used with NO position data and entries can be dragged onto the map. Save the data to the ScratchPad (text tab format) and upload it (or copy/paste using Ctrl-C Ctrl-V) into a Google Spreadsheet. Follow the extraction steps above and you've got a very quick site navigation map for your geo data using the BlurbsViewr.

Using extracted data with BlurbsViewr

Any of the above examples can be applied to the BlurbsViewr by appending the sample string to the path (don't forget to replace the & with a ?) ie. http://www.creative-cruising.com/blurbbits/blurbsviewr.html?blogger=svbillabong:100
Here's our Sv Billabong Blog in the BlurbsViewr.

Don't forget to increase your feed size if you want all the data mapped. Start with the BlurbBits Mapr to make sure you have some data before proceeding with the Viewr.

Create a BlurbBit


BlurbBits can be used in a standalone mode to create a photo gallery, describe your travel route and/or detail a location. If you have a blog or feed based website, we can use the individual BlurbBits to extract an image and location into a summary Journal/Blog map or Photo Album AND the BlurbsViewr for an interactive navigation map of your site. If your blog doesn't support native geotagging, BlurbBits are really just a cool way of adding Map locations and zoom levels to each Blog Post or Web Page while giving you something for your efforts. See Extracting Data for more details of the data extraction process and options. Make sure you start with BlurbBits Basics if you haven't already.

Why do I have to enter a position?

Actually you don't. BlurbBits can easily be used without it, however a location adds a map and gives the end user a chance to see the area/areas you are describing. Since each location also includes a zoom level, you can configure all sorts of maps: one that shows the entire world to another that shows the details of your house, apartment or boat location. What about geocoding? Geocoding will get you a starting position, but only you the writer knows exactly where/what area you are taking about. Do you mean Boston proper or the area surrounding Boston?

llz=42.35892,-71.05781,9

llz=42.35892,-71.05781,15

With the BlurbBits Mapr it really doesn't take that long to pinpoint exactly what area you are talking about and then you can add photos etc. Note: The BlurbsViewr requires position data to place entries on the map.

BlurbBits allows you to put your article, blog entry or webpage "on the map" while managing your photos in one central utility.

Create a BlurbBit:

BlurbBits are configured via Url Parameters appended to the Url Path of our basic utilities and sent through a standard webpage HTTP request.

ex: http://..../blurbbits.html?blogger=svbillabong&mtitle=Sample

The query portion of the URI is used to define the key=value pairs. Each additional parameter is appended following an ampersand &, e.g.: ?key1=value1&key2=value2. The query string MUST begin with a ? (only one) or you will get "page cannot be found" errors. If there is a problem or missing portion of your BlurbBit, it is most likely in the parameter passing. These parameters can be added to the Location bar of your web browser or links you add to your page.

Interactive Examples:

The easiest way to get used to something new is to try it. The BlurbBits documentation will be organized as follows:

Feature Name: &Parameter=Options
  • Option: short description
    More details etc
Interactive Examples:
&llz=36.2938,30.1497,12&mi=in
Our Current Location (Try adding a title by add &mtitle=SVBillabong after in)
Clicking on the icon to the left of the text box will load the example into a BlurbBit in a popup window. If you expand the popup you'll see ../blurbbits.html?design=true&llz=36.2938,30.1497,12&mi=in in the Location Bar. We've automatically added the ?design=true but the rest is as entered above. The data gets passed to our WebSite so we can customize it especially for you, that's how the URL parameters work.

The example text is also available in an interactive text box that allows edits. Change the example and hit enter or click the icon and the changes will be loaded into the BlurbBit. If there are any issues you can always refer back to the original example above. The BlurbBit is in design mode so the publishing options will be available under the info (i) button. The &mtitle=Title option is used to title both the map and the webpage.

If you are anything like us, you'll skip the reference part and go straight to the examples, just make sure you understand any gotchas before you create too many BlurbBits.


Embedded BlurbBit in Blog Post

Interactive Example BlurbBit

Note: In certain cases the resulting interactive examples will appear slightly different in the popup than in an embedded version. In the embedded version you can designate a cover photo, which lives on the actual page it is embedded on and is not a part of the BlurbBit. As a result some of the interactive examples may appear "naked" since they are not embedded.

The examples all begin with the & sign for ease of entering into the BlurbBits Mapr. If you are entering these directly onto the URL path, make sure the first & is replaced with a question mark, i.e. http://www.creative-cruising.com/blurbbits.html?llz=36.2938,30.1497,12&mi=in.

Basic Setup & Publishing

BlurbBit title: &mtitle=Title
  • Title: used as the map caption AND page title.
    Special characters must be escaped i.e. use %20 for space
  • within the BlurbBits Mapr
    The Mapr handles escaping of special characters
    Uses the user defined label as the title if use label is selected
Interactive Examples:
&llz=36.2938,30.1497,14&mtitle=Our%20Current%20Location
Adds a title to our previous map


Width and Height: &width=Width and &height=Height
  • Width: Measured in Pixels ex: 400
  • Height: Measured in Pixels ex: 400
    do not enter
  • If you are hand editing the results make sure you update ALL the references
    These reference are passed to ensure correct reproduction in all the viewing options.
Interactive Examples:
&llz=36.2938,30.1497,14&width=220&height=200
A smaller version of our map (for Sidebar)


Design size considerations

The Design Size can effect photo load times dramatically. The default sizes were chosen to optimize the available photos, and the square shape supports both Horizontal and Vertical orientation. If only a map is used or the photos are in a single orientation, the width and height can be manually adjusted.

Publishing Options

If you are using the interactive examples, first make sure the width and height are correct for your application (sidebar vs post). &width=400&height=400 works for a Standard Post and &width=220&height=200 works for the Sidebar. These values can be added directly to the interactive examples box if you need to change the default sizes. Select the i (info) button for the publishing options (design mode must be enabled).


Blogger users have it easy..

Note: Jan 08. We are investigating a Blogger editor bug related specifically to Internet Explorer version 6.* while using the Compose editor with Iframes (like BlurbBits). We HIGHLY recommend you upgrade to a newer/safer/faster browser like Firefox. BlurbBits published via the Add Link publishing option will not break the compose editor and All BlurbBits will display correctly. The Edit Html editor reportedly works fine.
  • Choose the Blog This entry to add a new Post/Entry about your new BlurbBit. We even hide all the ugly HTML code for you, the [BLURBBIT] section is replaced with the actual code at publishing time.
  • Choose Add Gadget to add it as a gadget to the Blog (ie. Not a Post). By default the Gadget will appear in the sidebar. If you have configured the BlurbBit for a different location, drag the widget into place.
    Note as of Nov 7, dragging was broken in the Add gadget window. Open the layout panel in a new window and drag it there.
  • To add a BlurbBit to an existing post, edit the post, select the Edit Html tab and paste the Embed in Website/Blog Entry (with feed) code into the desired location. If you are having a hard time finding where to place the code, use compose mode to MARK the code, ie. add XXXX. Then use the browsers search to find it in Html mode.
Other Options
  • For direct links, email or IM paste the URL link into your editor.
  • For sites that allow Iframes AND have a RSS feed (like Blogger), choose the Embed in Website/Blog Entry (with feed) option. This will handle both the post/web page and include a link (and optional photo) into the feed so others will have access to the BlurbBit.
  • For sites that allow Iframes but don't have an RSS feed use the Embed in Website/Blog sidebar option.
  • For sites that do not allow Iframes, choose one of the link options.
In the Blurbbits Mapr use the X button in the upper right corner to close the preview window.

Design Mode: &design=Mode

For all the interactive examples and the BlurbBits Mapr, the design mode is enabled.

This triggers a development mode that allows you to choose publishing options and set default sizes based on where the BlurbBit will be used. It can be used in a sidebar, footer or embedded into a blog post or website, you can even email or IM it.
  • Mode: one of the set {sm,med,lrg,sidebar,footer,true}
    • sm: 250x250
    • med: 400x400
    • lrg: 500x500
    • sidebar: 220x220
    • footer: 600x200
    • true: triggers the mode but doesn't define size
    Allows access to publishing options and sets the BlurbBit size if not defined via &width and &height parameters
  • Within the BlurbBits Mapr
    The Mapr handles the setup and allows a quick preview of various size options.
  • The examples are all configured with design mode enabled
    Once a BlurbBit has been tested, it can be published via the options under the i info button.
Interactive Examples:
You'll be using design mode in all the interactive examples.

Now What?

Flickr Photo/Map Viewer

BlurbBits is great for viewing geotagged flickr photos because it is focused around the photos not the map. We use Google static maps to add an overview map of your geotagged photos and an individual photo map for each photo.

With a single click the users can quickly see a map of the photos location. A zoomed out view is also available, so the user can always answer where was that?.


You can also add an additional map, this one shows our 5 year Sailing trip. Clicking on the route map will load a detailed view showing our current location. Selecting the photo strip menu button will load the photos from a set, add a geo photos map overview button to the main menu, and display the photo options menu. This menu allows you to toggle on/off various photo overlays including captions, photo notes, and/or the location map (if it has a geotag). Change photos by selecting the thumbnail or using the next/previous buttons.

flickr photos can be organized by set or filtered by tag and geotags.

Learn more about how to create your own, and play with some interactive examples.

BlurbBits Basics


So what exactly is a BlurbBit or a Blurb for that matter?

Blurb
Noun
  • A short summary or a promotional description, as on a book jacket.
  • On the Internet a blurb is used to provide a brief description or promotion of a larger work.

A standard blurb refers to words or written text, but in todays connected world shouldn't we leverage the available resources to enhance our blurb? We've tweaked the definition slightly: an eBlurb (electronic blurb) is just a blurb with optional photos, maps, videos, and links added to improve its effectiveness. The best way to explain a BlurbBit is to show you an example.

Stand Alone BlurbBits

How would you describe a 5 year, 30,000 mile Sailing trip if you had one chance? Photos are the first thought (we have 25,000), a map of our current location, maybe even a map showing our route.

This is a BlurbBit of our Sailing Trip w/Current Location (details below).


We feel our trip is best summarized by showing our entire route (colored by year) with some of our favorite photo albums. Clicking on the route map will load a detailed view showing our current location. Selecting the photo strip menu button (top menu) will load the albums, add a geo photos map overview button to the main menu, and display the photo options menu. This menu allows you to toggle on/off various photo overlays including captions, album notes, and/or the location map (if it has a geotag). Change albums by selecting the thumbnail or using the next/previous buttons. The photos IN each album can be viewed by clicking the open link button. A popup will appear showing the selected albums location and its photos can be loaded and navigated the same way as albums. Once photos are loaded, the geo-photos button will appear in the main menu along with a map link (in the sidebar) for each photo, both a detailed photo location and overview map are available. Well if a photo is worth a thousand words.. what's a BlurbBit worth?

BlurbBits can be installed and viewed almost anywhere that supports javascript. You can email or IM the link, embedded it in your website or blog, or add it as a link in sites that don't support embedded objects. The photos were extracted from our Picasa online albums and can be filtered to easily build a "focused" BlurbBit for a specific Blog Entry or Webpage Journal (Flickr is also supported).

GeoBlogging

Now this gives a pretty good overview and might get people interested in reading more about our trip, but it would be a pain (for us) to update it every time we move. Plus it only shows the photos and the maps, what about the journals or blogs about each location? What if we could add a geotag to our blog posts (creating a GeoBlog), so we could use the same BlurbBits viewer? Well you can!! In fact a BlurbBit (with a location) is used to define the blog post location. The results can be used to extract the data for various views of your blog.

Update:
if you use Blogger, we also support the new geotagged posts in addition to our existing formats, check out our examples including dynamic in Blogger maps. We've also documented a travel blog process which shows you how to turn your existing blog into the ultimate Travel Blog complete with maps and photos.

BlurbBits extracted from Blogger (click link to open):
  • "Where?" Blog Map View
    Extracts the Blogs most recent defined location and includes a link to the latest blog post.
  • GeoBlog Tracking Map
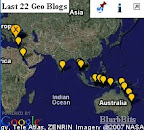
    Tracks the Blogs N most recent locations, can be filtered by date and category/tag.
  • GeoBlog Album of From The Galley
    This example extracts the first photo (and optional location) from each Blog post to build a Blog Photo Album.. Huh? .. oh just try it!! Each blog post appears with its photo, the notes will give a brief blog summary and the map will show the blog location (if available).
  • BBlinkInteractive Site Navigation Map


    BlurbsViewr ScreenShot

    This is all of our Sailing trip content including SailBillabong.com (videos, journals, photos) and our latest blogs from svbillabong.blogspot.com. Our Sailbillabong data was hand entered but each Blog location is automatically mapped using the extracted Blog location data and photos. Double clicking on the map icon or selecting from the list (upper right) will zoom to the location and open the selected content in the window below. If Quick Links is disabled (Map Options->Quick Links) a Page summary/photo is available for preview. The Map is fully interactive, check out the online help for more details.
  • And.. here's the best part. BlurbBits that extract data (like above) are automatically updated, you don't have to touch a thing!! Add or update a BlurbBit Blog post and your friends will get to see your latest location, check out your latest blog AND track your trips progress, auto-magically!!
Remote GeoBlogging or MoBlogs:

If you are in a remote location that doesn't have direct internet access, you can use Mail-to-Blogger to define the Lat/Long location through the text format. Based on the History of BlurbBits, this one was of the most important features.

Update: we've added a post specifically on Mobile Blog and Photo support. We even have a post dedicated to remote Photo editing and organization in Picasa, for the times you have your computer but no internet connection.

Geo This, Geo That..

Wow entering all that geo-data seems like a lot of work. Defining the Blog Post location is the only extra work involved, the photos and photo/Blog location maps were automatically extracted from the Geotagged photos/blogs. Geotagging 25,000 photos is a lot of work, especially if you try and do it all at once. But BlurbBits doesn't need any of the information described above to function.

Do you:
  • Have photos in Picasa or Flickr?
    You can use it as a simple photo viewer, with or without geo-tagged photos!! Then you can enhance it with a map of location and/or your travel route.
  • Want to build a simple map? Try your house, your boat, your favorite places.
  • Have photos in your Blogger Blogs? Extract a Blog Album.
  • Have a general feed (geo tagged or not) that you want to put on an interactive navigation map? Extract it into the BlurbsViewr.

BlurbBits are designed to Grow

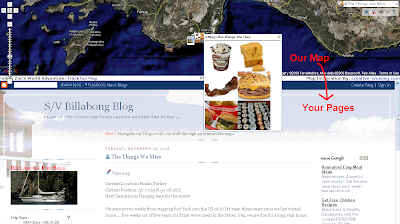
You can start with a simple email from the middle of the ocean, include your location, a small note about what's happening and we'll add it to your map (with Mail-To-Blogger you can even attach a small photo). Once you get re-connected to the internet you can upload your photos to Picasa or Flickr and add the photos you want to each BlurbBit (by album, pruned by tags, sets etc) while you update your blog with any additional notes or reflections. Then once you finally edit all your videos and compress them into something viewable, upload them to youTube and include them in your existing BlurbBits (coming soon).


Update: We've documented a complete Travel Blog process for Blogger. It can be used for other blogs that have RSS feeds however some of the commands may be slightly different.


You might have noticed we haven't mentioned login, upload to our site, load into our database etc. We have a hard enough time trying to keep track of our own 25,000 photos, let alone trying to manage yours. Blogger, Picasa, YouTube, Flickr and others all have 100's if not 1000's of engineers working to provide you the best and most up to date experience in their respective domains. We want to leverage that success and add to it, not compete with it.

We use existing data (extracted from RSS feeds) as much as possible, but we realize that some sites don't support feeds. In the future we are planing to add a database to allow searching and online storage but in the mean time there are plenty of things you can do to start preparing your data. Check out the BlurbBits Mapr help and look at the examples to get started.

Take your time and plan your content: think about how you will use albums, sets and/or tags/labels to divide your content. Tag/label your favorites and add a single tag to all your photos that is unique (like sailbillabong.com). Add captions and album notes. Start geo-tagging photos or keeping a location log for later use. The good news is you can always update the data later, and BlurbBits will automatically see the changes. Yes it may seem like work and it will take some time, but organization usually does. Once the photo data is available, you'll be able to use lots of very cool tools (including BlurbBits) to shuffle through it and slice and dice it into different views at will!!

Additional advantages

BlurbBits has some advantages over most traditional embedded photo viewers/maps and those users adding individual photos into each post. Even if you are "just" a simple blogger, you have entered the world of website design and the constant balance between performance and visual content. Surveys suggest that if your page doesn't load in 8 seconds, you'll lose up to a 1/3 of your visitors.. but photos, maps and gadgets all enhance the attractiveness of the site, so it's a fine balance. Some bloggers add as many gadgets, photos, and wizbang features they can think of, hoping to increase the chance that something will catch someones eye, but instead end up losing viewers who aren't willing to wait.
  • Embedded Maps
    BlurbBit maps use Google Static maps for speed while still allowing the user to zoom out/in to see another view and they can extract data from existing sources. The ability to combine maps with photos and travels routes makes it easy to add a single BlurbBit to a blog post or site. See the BlurbsViewr for interactive mapping options and a list of advantages over traditional interactive maps.
  • Embedded Photo Viewers
    BlurbBits are designed to load the photos only when the option is selected. This speeds up page loading and allows users to skip things they've already seen, without having to pay the performance penalty of reloading all the photos again and again every time they revisit your site (like a sidebar photo slideshow). A BlurbBit provides a single photo as a visual reference to both the blog viewer AND those viewing it through your feed. Most Embedded viewers or gadgets don't support feeds, in fact they are removed completely. If you take a look there is usually nothing in the spot where the slideshow or embedded map appeared on the original page. Check out our svbillabong.blogspot Feed to see how the BlurbBits appear!

  • Geotagged Photo Viewer
    BlurbBits is a one of the first geotagged photo viewers designed around the photo not the map. There are literally 100's of different ways you can view photos ON a map, but there are actually some people who don't like to use interactive maps (yeah crazy I know). They don't want to wait to load an interactive map only to get lost trying to find what they are looking for; the simple answer to "where was that?". BlurbBits allow you to add additional map information (route, track etc) to help enhance the photos that are about to be viewed.

  • Individual Photos
    Photos are great because they provide a quick visual reference to a subject mater in the text, but they are a pain to add to your blog. You have to format the text so it looks good around them, and re-add captions and notes you've probably already added in a photo editor somewhere. If you add too many photos, you'll slow down the page load.. AND .. you have to decide what size photo to display: too small and Grandma can't see them, too big and the blog text is harder to read. If you make changes to captions and notes (in the source data) you'll have to change them everywhere the photos are used. With BlurbBits, if you add/modify photos or change captions/notes, all the changes will appear in the BlurbBit automatically.

I like to have the BlurbBit near the top and add most of the text portion of the Blog Post below, after you've got the reader hooked. If you really need a visual reference for the text, try using a smaller version of the photo and highlighting the larger version in the BlurbBit.

There are other performance options that we'll describe in more detail later in a different blog , when we get a chance.

Group Emails for Journals

As you can imagine, we've met a lot of new people through our travels. An amazing number use group emails to communicate. What about the new friends you'll meet? How do they catch up on your travel history? Do you save and re-email old journals?

Get a blogger account and setup the Mail-to-Blogger option. Add the specified email address to your group email list and you are done. Your Blog will be an automatic archive of your emails AND you can even add a map and/or photos if you want. Now your new friends can "catch up" and your old friends have a place to go when they don't want to rifle through emails trying to find out where the heck you are.

Check out svbillabong.blogspot.com, most of those blogs were emailed from sea.

Update: We've add a Getting Started post to give you some pointers on where you could start.